Experiment No. 1
INTRODUCTION TO PRACTICAL CONTENTS AND EQUIPMENT
Object:- Introduction to practical contents, Equipment, and HSE (Health, Safety and Environment) measures.
Apparatus:- Basic Hydrology Tank and Permeability Tank
Theory:- The Basic Hydrology apparatus is a self-contained unit for studying basic hydrology.
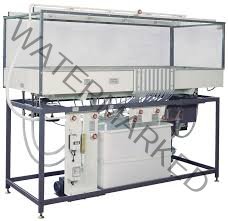
It consists of a large stainless-steel rectangular tank with adjustable tilting mechanism. The tank is filled with a granular medium. Two separate sets of four spray nozzles above the tank simulate rain fall on the catchments. The tank upper walls are transparent. Valve control of the nozzles varies the lag time on the hydrograph to simulate a moving storm.
The compartments at each end of the tank are connected to the catchment area by wire mesh to allow flow between the compartment and the catchment. Two wells with valve control are also provided at the middle of the tank. Twenty pressure tapings along the orthogonal axes of the tank measure water table profile by a manometer bank.
A metal frame supports the tank and houses a storage tank. Water is drawn from the storage tank by a pump and separately supplied to the overhead nozzles and/or the two end compartments via a flow meter and piping with valve control. Run-off from the catchment is measured by a calibrated rectangular weir or returns directly to the storage tank.
The apparatus is a transparent-sided tank, mounted on a steel-framed bench with worktop. The tank is clear so students can see the flow patterns. The sides are plate glass to resist abrasion from the permeable medium. The rear of the tank contains pressure tapings. Each tapping has filters that stop any unwanted particles. The tapings connect to a bank of piezometer tubes at the side of the apparatus which allow measurement of the head distribution along the tank. Removable stainless-steel mesh baffles at each end of the tank hold the permeable medium (usually sand) in place. At each side of the baffles are end compartments with adjustable overflow pipes for setting the water levels at each end of the model. The top of the tank is open to allow students to fill the tank and set up model structures. Supplied are clear, self-sealing plates for students to build models of sheet piling, walls and simulated dams. Included is a dye-injector system to help show flow lines. Around the front edge of the glass tank are scales to help students position and measure flow nets correctly. The self-contained apparatus needs only a mains water supply and drain.

Figure 1. Basic Hydrology Tank Apparatus

Figure 2. Permeability Tank
Health and Safety Precautions and Instructions
1. Be Aware of Your Surroundings
2. Report all accidents, injuries, and breakage of glass or equipment to instructor immediately.
3. Keep pathways clear by placing extra items (books, bags, etc.) on the shelves or under the worktables,
4. Wear safety goggles to protect your eyes when heating substances, dissecting.
5. Long hair (chin-length or longer) must be tied back to avoid catching fire.
6. Wear sensible clothing including footwear. Loose clothing should be secured so they do not get caught in a flame or chemicals.
7. Do not lean, hang over or sit on the laboratory tables
8. No eating or drinking in the lab at any time!
9. Follow all instructions given by your teacher.
10. Unauthorized experiments or procedures must not be attempted.
11. Keep solids out of the sink.
12. Use Tools and Machines Properly
13. Keep Emergency Exits Easily Accessible
14. Report Unsafe Conditions to Your Supervisor
15. Use Mechanical Aids Whenever Possible